Showing posts with label Monet. Show all posts

Wednesday, January 17, 2018

New Covers in January!

A number of covers by Rachel and I out this week and last...


JLA 22 from DC Comics


Bombshells United #10 from DC Comics


Generation X #86 from Marvel Comics

TD

Monday, May 11, 2015

X-Men #23 Cover

 Here's how the cover to Marvel Comics X-Men #23 was made-


This is the first issue of a new arc - so different setting.

The sketches are drawn at 2x3 inches in my sketchbook in pencil and pen and then cleaned up and colored in Photoshop.


Pencils drawn in Light Blue and HB lead on 12 x 18 Bristol Board.

Inks to come...


Colors by me in Photoshop CS3 with a Cintiq 13 HD


Detail of the colors

TD

Friday, December 5, 2014

X-MEN 21 Cover - Step by Step Part 1 - LINEART

Here's a look behind the making of the cover to X-Men #21 from Marvel Comics - out in stores now!


The idea behind this cover was a Drew Struzan Movie Poster type cover - epic space theme with Rachel front and center! 

The sketch was drawn at 2x3 inches in my sketchbook in pencil and pen and then cleaned up and colored in Photoshop.

After getting appr0val from Marvel Editor Daniel Ketchum I moved on to pencils..


Here's my initial rough stab at the pencils.

Pencils  drawn in Light Blue and
 HB lead on 12 x 18 Bristol Board.


Final pencils.


For solicitation there wasn't time to ink the cover so I colored my pencils.


For the final version - Rachel Dodson inks

Rachel uses Windsor Newton Series 7 Kolinsky Sable #2 Brush and Higgins Black Magic Ink to ink the covers with.

Then scan and clean in Photoshop

Next Time...

COLORS!

You can find this comic at your local comic book retailer


And digitally at 


TD

Wednesday, September 10, 2014

X-MEN #19 Step by Step PART TWO INKS


How we made the cover to X-Men #19 (out now from Marvel Comics by Marc Guggenheim and Harvey Tolibao).

Now, part two - Rachel's inks…


The final art inked directly over my pencils on 12 x 18 Bristol Board


Rachel likes to start inking the foreground elements first


and then work her way back


Rachel uses Windsor Newton Series 7 Kolinsky Sable #2 Brush and Higgins Black Magic Ink to ink the covers with.


Still all brush work


The final inked art.


Details of the final inks.

Next, the colors…

You can find this comic at your local comic book retailer


And digitally at 


TD


Monday, September 8, 2014

X-MEN #19 Step by Step PART ONE Pencils


How we made the cover to X-Men #19 (out now from Marvel Comics by Marc Guggenheim and Harvey Tolibao).

As usual we start off with the cover sketches


Editor Daniel Ketchum and I discussed the story - still featuring the X-Men in Space - but went with an "ALIENS" scary type of scenario.

B was picked.

The sketches are drawn at 2x3 inches in my sketchbook in pencil and pen and then cleaned up and colored in Photoshop.


Initial pencils of Psylocke and Monet drawn in Light Blue and HB lead on 12 x 18 Bristol Board.


I was happy with the drawing itself so wanted to capture the mood of the sketch so I scanned in the drawing and matched the shadows and blacks up with the sketches.


I then printed out that art and used a light board to trace the blacks - marked with an X- in the pencils.


Details of the pencils.

Really happy with how this drawing turned out.

I did a few refinements on the space suits - I took the best elements of the one's on the 18 cover and made a new master suit for this cover.

Next time - Rachel's inks!

You can find this comic at your local comic book retailer


And digitally at 


TD

Saturday, August 23, 2014

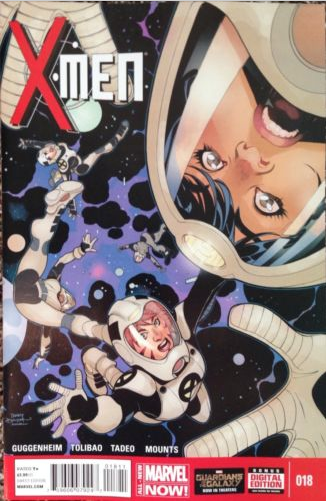
X-MEN #18 Step by Step PART TWO Colors

How we made the cover to X-Men #18 (out now from Marvel Comics by Marc Guggenheim and Dexter Soy).

And so the colors…

I use  Photoshop CS3 and Wacom Cintiq 13HD to color with.


FLATS

The first stage of coloring is to have the art "flatted".

Flatting allows me to choose an area to color at any point throughout the coloring process.

At this stage I go and adjust the colors to their medium value or imprimatura - I use this as the starting point.


Initial rough on color on Jubilee


Start adding colors to other characters and adjust the background colors.
  

Detailing Jubilee and Rachel.


When I'm comfortable with the colors I go in and adjust the lineart - from black to whatever is the appropriate color I want it to be.


The final colors.


The actual comic in print.

You can find this comic at your local comic book retailer


And digitally at 


TD

Friday, August 22, 2014

X-MEN #18 Step by Step PART ONE Pencils and Inks

How we made the cover to X-Men #18 (out now from Marvel Comics by Marc Guggenheim and Dexter Soy).

This bad boy had to be turned around really quick so not too many stages to show this time…

As usual we start off with the cover sketches


Editor Daniel Ketchum and I discussed this new story arc featuring the X-Men in Space so had a blast coming up with ideas.

B was picked.

The sketches are drawn at 2x3 inches in my sketchbook in pencil and pen and then cleaned up and colored in Photoshop.


Pencils drawn in Light Blue and HB lead on 12 x 18 Bristol Board.


Rachel Dodson uses Windsor Newton Series 7 Kolinsky Sable #2 Brush and Higgins Black Magic Ink to ink the covers with.

Next time - the colors…

You can find this comic at your local comic book retailer


And digitally at 


TD

Monday, December 23, 2013

X-Men #7 Page 12 - Script to Line Art

A look behind the making of  Marvel Comics X-Men #7 Page 12 (out in stores now).


Here's Brian Wood's script for page 12 from X-Men #7. I print this out on 8.5 x 11 paper. I drew the page layout right on the script - loose but I knew exactly what I was going to do. 

This was a decent way into the issue so I already had a good idea of what the page would look based on the scene I was drawing so no need for a real tight layout. This entire issue was drawn at about an 8 page a week pace as opposed to my more comfortable 4-5 pages a week so I was really flying - optimizing shortcuts over details. So, I really try to prioritize storytelling and solid drafting over everything else in this situation.


This page was drawn on 12 x 17 Marvel stock bristol board, using a Col Erase Light Blue and Staedtler HB Lead pencil.

 I started with the "easiest" to draw elements first, to give myself a mental lift of having a page "almost" completed at the beginning :-).


Storytelling wise, the 5th had the most to convey "acting" wise so felt I really needed to nail that next.


Finishing that panel.


The storytelling and rough in did all the work for me, I'm just putting lead to page at this point to get the page drawn.


Detail of the 3rd panel.


And voila, the last of the details down, I ink the cars myself with Copic Multi Liner pens.


Rachel inking directly on my pencils, using a Windsor Newton Series 7 #2 Sable Brush, Higgins Black Magic Ink plus a croquille and tech pen for some details.


A close up look at Rachel's inking.


The artwork is then scanned and cleaned in Photoshop - I adjust the panels so they all fit and have proper borders. Then I put it on the Marvel Server for the colorist.

TD

Thursday, December 19, 2013

X-Men #7 Page 10 - Script to Line Art

I haven't done one of these in a long time - a look behind the making of a page of comics. This is for Marvel Comics X-Men #7 Page 10 (out in stores now).


Here's Brian Wood's script for page 10 from X-Men #7. I print this out on 8.5 x 11 paper. On the right side you see my little sketches for the panel layouts.

This was a decent way into the issue so I already had a good idea of what the page would look based on the scene I was drawing so no need for a real tight layout. This entire issue was drawn at about an 8 page a week pace as opposed to my more comfortable 4-5 pages a week so I was really flying - optimizing shortcuts over details. So, I really try to prioritize storytelling and solid drafting over everything else in this situation.


This page was drawn on 12 x 17 Marvel stock bristol board, using a Col Erase Light Blue and Staedtler HB Lead pencil.

 I always get the figures drawn first so as not to waste time fussing with background details - I will do this last as time allows - however the backgrounds and perspectives are are roughed in lightly.


Tightening in on the characters.

In the 3rd panel, I need more space to get Karima all drawn in correctly so the drawing goes outside the border - but as a happy accident,  I think I will leave it to enhance the storytelling.


A close up look at my pencils.

                                                    
Here's the final pencils. I ink the vehicles myself as Rachel Dodson hates inking cars and I know exactly how I want them to look.


Rachel inking directly on my pencils, using a Windsor Newton Series 7 #2 Sable Brush, Higgins Black Magic Ink plus a croquille and tech pen for some details.


A close up look at Rachel's inking  - that's all brush!

The artwork is then scanned and cleaned in Photoshop and put on the Marvel Server for the colorist-
And here's the final colors by Andrew Crossley.

Et voila - comic book page!

TD