Showing posts with label Captain Marvel. Show all posts

Friday, November 25, 2022

Officially Licensed Marvel Signature Prints by Rachel and Me


Officially Licensed Marvel Signature Prints now available in my SHOP - 


There are three 11 x17 prints with a metallic MARVEL logo available-

Amazing Spider-Man 
Black Cat
Avenging Spider-Man featuring Captain Marvel


All prints will be signed by Rachel Dodson and me plus a remarqued version is available, with a small original drawing on it of the character in the print.

Signed by Rachel and Terry Print $30 

With Head Sketch Remarque $60.

Friday, April 19, 2019

Captain Marvel Sketch Step by Step

Here's a step by step look at how I made this Captain Marvel Sketch.


Tools

11" x 14" Canson Mi-Teinte Paper
Col Erase Carmine Red Pencil

Pitt S, F and B Pens
Pigma Micron 1 Pen
Copic Warm Grey 1, 2, 3, 4, 6 Pens
Prismacolor White Pencil
Uni Posca White Marker


And the completed Art

TD


Tuesday, December 4, 2018

Avenging Spider-Man #9 Cover Art Step by Step

 Here is my process for creating the cover to Avenging Spider-Man #9 (July 2012) featuring Captain Marvel and Spider-Man. 
Didn't have much to go off, so this is what I did!


Here's the  1" x 2" roughs drawn in my sketchbook and then
 adjusted and colored in Photoshop that I sent in to Marvel for approval.


Pencil stage drawn on 13 x 19 inch 2 Ply Bristol Board with HB and Light Blue lead.


Finished pencils.


Rachel inks over my pencils using a Winsor Newton Series 7 #2 Sable Brush and FW Acrylic Ink


First pass at colors in Photoshop CS3 using a Wacom Graphics Tablet (circa 2001) at 7 x 10.6 inches and 800dpi in RGB using Channels.


Final colors and coloring of line art on a separate "Screen" Layer .

VOILA!

Cool to see that this has held up! I would like to work on the clouds some more in the color stage ... c'est la vie...

TD


Wednesday, September 5, 2018

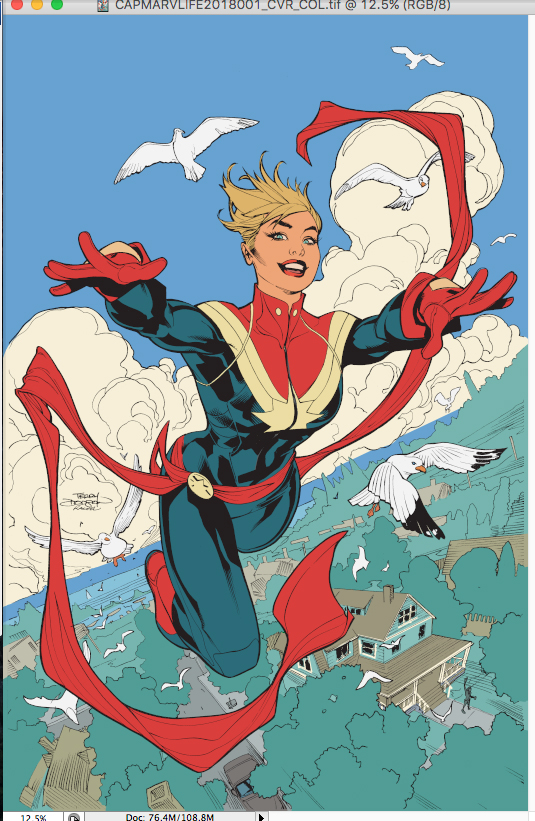
Life of Captain Marvel #2 Cover Art Step by Step Part 3 Color


Check Out how we made it

PART 3

COLOR

FLATS


The first stage of color is called flats - flatting allows me to choose an area to color at any point throughout the coloring process.

INITIAL COLOR ROUGH


I colored this on my Cintiq 22 HD using Photoshop CS3 .


I knew I wanted a strong rim light, so I got Captain Marvel's face value approximately right then hit it with the RIM light.


I then rough in quickly all the medium lights and darks on the figures and cast initial shadows.


Using the Pencil Tool (Hard Round pixel Brush) at 100% to to begin and then switch to lower 30-50% to get the right value of color for the next stages of rendering.

COLORING THE LINE ART


This is the icing on the cake step of the process.


I colored a lot of the black lines - notice the lips, flesh outline clothes and SFX in the background.


Working more on the clouds and background
  
FINAL TOUCHES


Pushing the final highlights

FINAL


PART 1


PART 2


TD

Monday, September 3, 2018

Life of Captain Marvel #2 Cover Art Step by Step Part 2 Line Art


Check Out how we made it

Part 2 Line Art


Rachel Dodson's initial start on the line art on this cover.


Rachel inks directly over my pencils.


Rachel inks with a Windsor Newton Series 7 Kolinsky Sable #2 Brush and Royal Talens India Ink.


FINAL


Detail


Artwork is scanned into Photoshop at 800dpi Gray full size. I then go in and convert to Bitmap and clean to prepare for...

COLOR

Next time in

PART 3

And

PART 1


Friday, August 31, 2018

Life of Captain Marvel #2 Cover Art Step by Step Part 1 Pencils


Part 1 of the Step by Step making of the cover art -

PENCILS


COVER SKETCH
The cover concept I sent into Marvel Comics for approval. 
Roughs were drawn at 2" x 3" in my sketchbook using Warm Grey Copics then colored in Photoshop CS3.


Quickly roughed in the drawing making sure the composition still help.


Drawn in Light Blue and HB Lead on 13" x 19" Bristol Board 


Making sure those CHEEKS are happy!!!


Knew how I wanted this hand, by gosh!


Since I'm happy with my rough in I go to "tight" (ink-able) pencils.


On to the background...


GULLS!


And the final pencils, all ready for Rachel Dodson to ink...


Detail

Next time, 

PART 2

INKS 

TD


Wednesday, September 20, 2017

Captain Marvels Step by Step Part 3 Color


Part 3 of the Step by Step making of the cover art for Generations The Bravest 1 featuring the Captains! -

COLOR


FLATS

The first stage of color is called flats - flatting allows me to choose an area to color at any point throughout the coloring process.

I try to adjust the colors to their medium value or imprimatura - I use this as the starting point for the piece. 


INITIAL COLOR (ROUGH IN)

I colored this on my Cintiq 22 HD using Photoshop CS3 .

Here I rough in quickly all the medium lights and darks on the figures and cast initial shadows.

Using the Pencil Tool at 100% to knock those in.

I also use the Pencil Tool at about 40% Yellow for the Rim Lighting...


COLORING THE LINE ART


See how I turn the black lines to color...


This is the icing on the cake step of the process.


I colored a lot of the characters black lines, including Carol's eyebrows!


Detail of those lines...


FINAL COLOR


And done!

PART 1


PART 2

TD